Sternum X-Ray Positioning: RAO and Lateral Views
The sternum (breastbone) is one of the most challenging structures to image in diagnostic radiography. Its superficial location on the anterior chest wall might suggest it should be easy to see — but in practice, the overlying mediastinal structures, ribs, lung markings, and the spine all conspire to obscure the sternal cortex. Getting a diagnostic sternum series requires precise positioning, a carefully executed breathing technique, and a solid understanding of the anatomy you're trying to visualize.
This guide covers the common dedicated two-view routine—PA oblique (usually RAO) and lateral—while clearly labeling protocol variants. It separates the PA-oblique motion-blur technique from lateral-view instructions and distinguishes educational positioning from trauma imaging decisions. Technique charts, the examination order, equipment instructions, and the radiologist-approved local protocol always govern.
For related thoracic imaging guides, see our rib X-ray positioning guide and portable chest X-ray technique article.
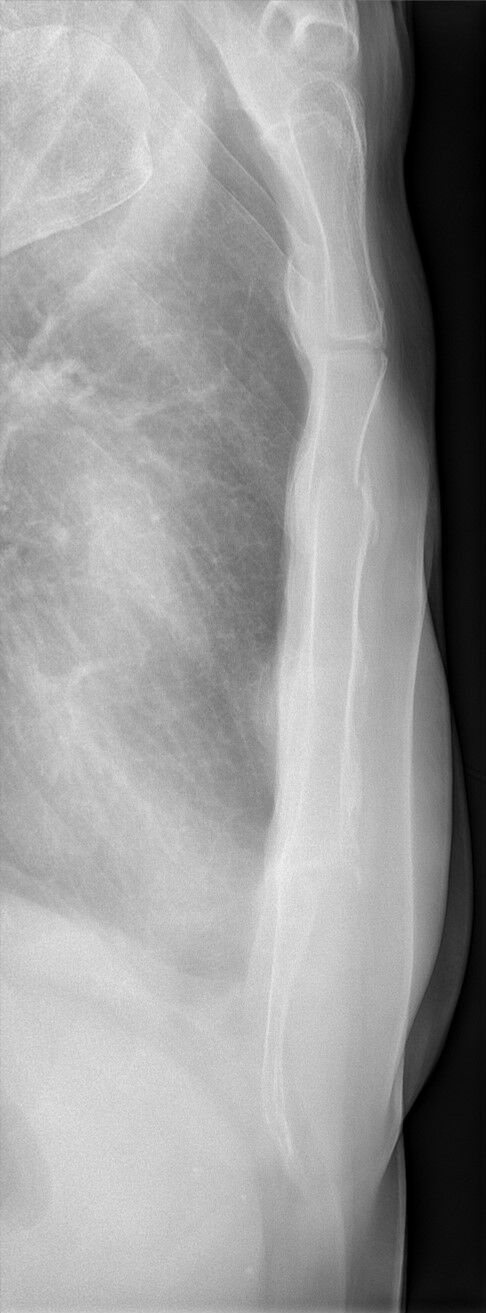

Sternum Anatomy: What You Need to Know
The sternum is a flat, elongated bone forming the anterior midline of the thoracic cage. It consists of three parts:
- Manubrium — the broad superior segment; it articulates with the clavicles, first costal cartilages, and the superior part of the second costal cartilages.
- Body — the longest segment; together with the manubrium and xiphoid junction it receives costal cartilages 2–7.
- Xiphoid process — the variable inferior segment. It is cartilaginous early in life and ossifies variably; bifid and foraminal configurations can be normal variants.
Key landmarks for positioning:
- Sternal angle (Angle of Louis) — the palpable manubriosternal junction, generally at the T4–T5 intervertebral level. It is an anatomy landmark, not the routine sternum centering point.
- Sternal notch — the palpable depression at the superior border of the manubrium (T2–T3 level).
- Jugular notch and xiphoid process — palpate these boundaries when appropriate; their midpoint defines the usual CR level.
On a straight PA projection the sternum is superimposed on the thoracic spine. A slight anterior oblique moves it off the vertebral column and, in the usual RAO, places it over the relatively uniform cardiac shadow.
📝 Do Not Confuse the Landmarks
The sternal angle is near the T4–T5 disc and the transverse thoracic plane; the carina is often near this level but varies with respiration and patient anatomy. For sternum radiography, center at the midpoint between the jugular notch and xiphoid process, not automatically at the sternal angle.
The Standard Sternum Series
A common dedicated sternum series consists of two projections; protocols vary:
PA Oblique (RAO/LAO)
Moves the sternum off the spine and over the heart shadow. Usually performed as an RAO.
Lateral Sternum
Shows the sternum in profile and depicts displacement. Preferably performed erect.
Protocol Variant
A straight PA/AP is not a universal routine view. Perform only when ordered or included in local protocol.
💡 Clinical Note
The University of Missouri clinical procedure guide identifies RAO and lateral as its routine/ARRT-required sternum projections. ARRT's examination content outline lists the sternum within thorax procedures but does not promise a particular number of sternum questions or mandate one universal projection recipe. Learn the principles and use the protocol supplied in clinical practice.
Projection 1: PA Oblique Sternum (RAO)
The PA oblique projection uses slight rotation to move the sternum off the thoracic spine. The RAO generally projects it over the heart shadow, creating a more uniform background.
Patient Position
- Prone on the table or erect against the upright Bucky
- Position the right anterior thorax nearest the IR; arrange the arms so they do not obscure the sternum and keep the shoulders in the same oblique plane
- Rotate approximately 15–20° RAO for an average adult. This is a teaching range, not an invariant value: a broad/deep chest generally needs less rotation and a narrow/shallow chest more.
- An LAO reverses the direction of displacement and is a protocol-dependent alternative, not an equivalent default; document the actual position.
📝 Why RAO?
The RAO is commonly taught because it projects the sternum off the spine and over the heart shadow. The earlier claim that RAO moves the heart away from the sternum was incorrect. Comfort alone does not justify rotating a trauma patient; maintain spinal precautions and obtain authorization for any modified projection.
Central Ray
- Perpendicular (0°) to the IR
- Centering point: midpoint of the sternum, halfway between the jugular notch and xiphoid process; commonly about 2.5 cm (1 in) left of the midline in an average RAO
- The CR enters the posterior thorax and exits through the sternum anteriorly
Breathing Technique
For the PA oblique, many teaching protocols use low mA and a several-second exposure during quiet, shallow breathing. Exact time is selected from the validated technique chart; 3–4 seconds is a common teaching target, not a universal requirement.
- The sternum itself is relatively immobile during respiration
- The overlying pulmonary and rib detail moves during breathing, reducing its conspicuity by motion blur
- This does not eliminate scatter and is not an air-gap technique
- The goal is a sufficiently sharp sternum against less conspicuous blurred background detail
How to instruct the patient: "Take slow, shallow breaths — like you're blowing on a hot soup — but don't move your body. Breathe gently in and out while the machine makes its noise." Practice the breathing with the patient before you start the exposure.
Technical Factors
| Parameter | Value |
|---|---|
| IR size | 24 × 30 cm (10 × 12 in), portrait |
| SID | Department-specific; classic teaching uses 76–102 cm (30–40 in), with the shorter SID deliberately magnifying the sternum over the heart shadow |
| Grid | Use when required by patient thickness, equipment, and the department's technique chart—not an automatic universal requirement |
| kVp / mAs | Use the validated chart for detector, grid status, patient thickness, and required image quality; no portable universal numeric technique is safe |
| Exposure time | Several seconds if the protocol uses quiet-breathing blur (commonly about 3–4 s in teaching guides) |
| Breathing | Quiet, shallow respiration throughout the PA-oblique exposure when using this technique |
Evaluation Criteria
- Sternum projected lateral to the thoracic spine — the most critical check. If the sternum overlies the spine, rotation was insufficient
- Full sternum visualized — manubrium, body, and xiphoid process all included
- Cortical margins sharp despite breathing technique — the sternum should be the sharpest structure in the image
- Background lung markings and ribs blurred — if the ribs appear sharp, the breathing was too shallow or the exposure too short
- Appropriate obliquity — enough to clear the spine without excessive distortion; judge against the expected appearance and local reject-analysis criteria
Common Positioning Errors
| Error | Likely Cause | Correction |
|---|---|---|
| Sternum overlies the spine | Usually insufficient rotation | Adjust obliquity for body habitus; do not force an injured patient |
| Sternum appears excessively distorted | Usually excessive rotation | Reduce obliquity within the local positioning range |
| Rib and lung detail remains prominent | Breathing technique not used/effective | If protocol permits, use quiet breathing and the charted long-time technique |
| Upper sternum (manubrium) cut off | Centering too low or collimation too tight | Re-center to the midpoint between notch and xiphoid |
| Xiphoid cut off inferiorly | Collimation too tight or centering too high | Include full length; center at mid-sternum |
| Inadequate receptor exposure / excessive noise | Technique or processing issue | Use the departmental technique chart and exposure-index target; do not apply an arbitrary increase |
| Motion artifact on sternum itself | Patient moved entire body instead of just breathing | Reinstruct — only the chest should move, the body stays still |
Projection 2: Lateral Sternum
The lateral sternum shows the bone in profile and can demonstrate fracture displacement or step-off. Retrosternal soft-tissue opacity may be seen, but radiography neither excludes mediastinal injury nor determines cardiac injury.
Patient Position
- Erect lateral is preferred when safe; either side may be used according to equipment and local protocol
- True lateral: the mid-coronal plane is parallel to the IR
- Draw the shoulders and arms posteriorly (often hands clasped behind the back) to move upper-arm soft tissue away from the sternum
- Use supports only if they do not compromise alignment or trauma precautions
- A supine horizontal-beam lateral is a protocol-dependent modification. Do not sit, roll, or rotate a patient with suspected spinal or other unstable injury without clearance.
Central Ray
- Perpendicular (0°)
- Centering point: midpoint of the sternum, halfway between the jugular notch and xiphoid process
- Use a horizontal beam for the erect lateral; maintain the same midpoint for an authorized cross-table modification
Technical Factors
| Parameter | Value |
|---|---|
| IR size | 24 × 30 cm (10 × 12 in), landscape or portrait |
| SID | 150–180 cm (60–72 in) in common teaching protocols, reducing magnification created by the lateral OID |
| Grid | According to patient thickness, equipment, and local chart |
| kVp / mAs | Validated departmental technique chart; do not transfer fixed values between detector/grid systems |
| Breathing | Commonly suspend on inspiration; a local protocol may specify another method |
Evaluation Criteria
- Entire sternum in profile, including manubrium and xiphoid, without superimposition by the humeri
- Retrosternal region included with adequate penetration to assess cortical detail
- No rotation — the sternum is in profile without duplicated cortical margins
- No patient-motion blur and appropriate collimation/exposure index
💡 Retrosternal Opacity Is Nonspecific
Do not use an unsupported universal 2.5-cm cutoff. A new retrosternal opacity after trauma can represent hematoma, but its presence is not a reliable marker of cardiac or aortic injury. Escalation is based on mechanism, physiology, examination, chest imaging, and the trauma team's protocol.
Protocol Variant: Straight PA or AP
A straight PA or AP is not part of every dedicated sternum routine and the sternum remains superimposed on the spine. Use it only when the order/local protocol specifies it or when an authorized modification is needed; do not present it as an equivalent substitute for the RAO.
Patient Position
- Prone or erect PA facing the upright Bucky
- Arrange arms and shoulders according to the specified protocol without compromising patient safety
- Mid-sagittal plane centered to the midline of the grid/Bucky
Central Ray
- Perpendicular (0°) to the IR
- Centering point: midpoint between the jugular notch and xiphoid at the mid-sagittal plane
Technical Factors
| Parameter | Value |
|---|---|
| IR size | 24 × 30 cm (10 × 12 in), portrait |
| SID / grid / exposure | Use the projection-specific validated local technique; these are not universal across systems |
| Breathing | As specified by the local projection protocol |
📝 AP vs PA Geometry
PA places the anterior sternum nearer the IR and therefore reduces OID compared with AP. That geometric fact does not make a straight PA a standard replacement for the PA oblique, and claims about the heart “falling away” are not a sound positioning rule. For patients who cannot tolerate the routine position, obtain the safest authorized modification rather than forcing prone positioning. See the kVp and mAs exposure factors guide.
Sternum Positioning at a Glance
| Projection | Patient Position | CR | Centering Point | Breathing |
|---|---|---|---|---|
| PA Oblique (RAO) | Prone/erect, commonly 15–20° RAO; adjust for habitus | 0° perpendicular | Midway notch-to-xiphoid; about 2.5 cm left of MSP | Quiet breathing over several seconds when protocol specifies |
| Lateral | Erect true lateral, shoulders/arms back | 0° horizontal | Midway notch-to-xiphoid | Usually suspend on inspiration |
| Straight PA/AP variant | Only if ordered/protocolled | Protocol-specific | Midway notch-to-xiphoid | Protocol-specific |
Why the Breathing Technique Works: The Physics
The PA-oblique breathing technique is intentional motion unsharpness, not scatter control. It should not be confused with an air gap or grid.
During respiration, ribs and pulmonary markings change position. The sternum also participates in chest-wall motion, so it is not literally stationary; quiet shallow breathing is used to limit its movement while blurring more conspicuous overlying detail:
- The moving structures (ribs, lung markings) are recorded at multiple different positions on the IR, creating motion blur
- The sternum should remain sufficiently sharp only if respiration is shallow and the torso does not move
- Blur reduces anatomic distraction; it does not remove scatter or act like a grid
- Excessive respiratory or body motion can blur the sternum and make the image nondiagnostic
Key technical requirement: use the low-mA/long-time combination specified by the departmental chart when intentional blur is desired. There is no evidence-based requirement for “at least two respiratory cycles,” and digital receptor exposure is described by exposure index rather than film “density.” Avoid repeats by rehearsing the instruction and checking positioning before exposure.
For more on how grids and scatter control affect image quality, see our radiographic grids and scatter control guide. For technique chart fundamentals, see our exposure technique charts article.
Sternal Fractures: What to Look For
Suspected fracture is a common indication for dedicated sternum radiography, although modern trauma workups often detect fractures on CT performed for the overall injury pattern.
Mechanisms of Injury
- Direct anterior compression/blow — common in motor-vehicle collisions, sports trauma, and falls
- Indirect force/hyperflexion — a less common mechanism; evaluate the whole trauma pattern rather than inferring associated injuries from mechanism alone
- Iatrogenic — during CPR (chest compressions) or post-sternotomy (cardiac surgery)
Fracture Patterns
- Transverse fracture commonly involves the body; look for cortical disruption or lucency with or without displacement
- Manubriosternal joint injury — malalignment or separation at the sternal angle may occur
- Comminuted fracture — multiple fragments can occur with substantial force
- Xiphoid injury — uncommon and difficult to assess radiographically because anatomy/ossification is variable
🩺 Associated Injury: Use the Trauma Pathway
A sternal fracture can accompany thoracic injuries, but it is not by itself proof of blunt cardiac injury. EAST recommends an admission ECG for patients in whom blunt cardiac injury is suspected; a normal ECG plus normal troponin I rules it out in that guideline, while an abnormal result requires monitored evaluation. A sternal fracture alone should not prompt cardiac monitoring when ECG and troponin I are normal. CT selection for major blunt trauma is made by the trauma team from the complete clinical picture—not a fixed vehicle-speed threshold. See our trauma radiography principles guide.
Pediatric and Geriatric Considerations
Pediatric Sternum Imaging
The pediatric sternum develops from multiple ossification centers, and normal developmental appearances can mimic injury. Ossification and fusion are variable and continue beyond the late teens in some individuals; avoid a single “fully ossified” age claim. Adapt the examination to age and cooperation:
- Immobilize safely and use pediatric technique charts; do not trade unnecessary motion blur for excessive exposure
- Ultrasound can depict superficial cortical disruption without ionizing radiation, but operator dependence and local expertise matter; it is not a universal first-line mandate
- CT is not automatically the “gold standard” after every nondiagnostic radiograph; the clinician/radiologist balances the complete trauma question against pediatric radiation risk
- Explain and rehearse breathing only when the child can cooperate; otherwise use the locally approved alternative technique
Geriatric Sternum Imaging
Elderly patients present different challenges: the sternum may be osteoporotic (subtle fractures), the patient may have difficulty standing erect or lying prone, and the breathing technique may be harder to coordinate. Key adaptations:
- Seated lateral may be better tolerated when permitted; support the patient and keep the sternum in true lateral without assuming an “affected side” rule
- Do not increase kVp merely because bone is osteoporotic; choose factors from measured thickness and the validated technique chart
- If quiet breathing cannot be coordinated, use the approved short-time alternative rather than assuming “any blur is better than none”
- An atraumatic fracture or focal destructive/sclerotic change warrants radiologist assessment for pathologic fracture; do not infer a specific primary malignancy from the radiograph alone
Trauma, Pregnancy, Dose, and Scope Safeguards
- Trauma: stabilize first. Do not remove immobilization, roll, stand, or oblique a patient until the responsible clinician has cleared the movement. Use a horizontal-beam or other authorized modification when needed.
- Imaging escalation: dedicated radiographs answer a focused bony question but do not exclude intrathoracic injury. ACR major-blunt-trauma guidance supports chest radiography and/or CT according to hemodynamic status, mechanism, and suspected injury; the radiographer does not independently substitute CT for the ordered study.
- Pregnancy: verify pregnancy status under facility policy, but do not cancel or delay a medically indicated examination on your own. Optimize by tight collimation, correct positioning, the validated technique chart, and avoiding repeats. The fetus is outside the primary sternum beam when correctly collimated; risk questions or protocol changes go to the radiologist/medical physicist.
- Shielding: routine gonadal/fetal contact shielding is no longer recommended by AAPM because it provides negligible benefit outside the beam and can obscure anatomy, interfere with automatic exposure control, or cause repeats. Follow current facility policy; shielding never replaces collimation.
- Dose: no defensible universal sternum effective-dose number applies to every projection, patient, and system. Use indication-specific images only, monitor exposure index, collimate, and avoid repeats. A longer exposure time does not itself lower dose; mAs and the full technique determine receptor exposure and patient dose.
- ARRT scope: ARRT certification standards assess positioning, radiation protection, image evaluation, and patient care. They do not authorize a technologist to diagnose, order CT, clear a spine, or override the examination order/local scope-of-practice rules.
Positioning Errors: Quick Reference
| Error | Likely Cause | Correction |
|---|---|---|
| Sternum projects over spine (PA oblique) | Usually insufficient rotation | Adjust within the habitus/local range |
| Excessive distortion (PA oblique) | Usually excessive rotation | Reduce obliquity |
| Rib detail prominent | Intentional blur not achieved | Use the approved long-time quiet-breathing technique |
| Manubrium not included | Centering/collimation too low | Center midway between notch and xiphoid |
| Xiphoid cut off | Collimation too tight | Open collimation inferiorly |
| Double border on lateral sternum | Patient not in true lateral | Check shoulders and hips alignment |
| Retrosternal region excluded | Collimation or centering error | Re-center/collimate to include the sternum and adjacent region |
| Excessive noise / low exposure index | Technique or processing issue | Consult the validated chart; never apply an arbitrary percentage increase |
ARRT Exam Prep: Sternum Quick Review
ARRT does not publish a guaranteed count of sternum questions. Its content specifications place sternum work within thorax positioning and broader patient-care, safety, and image-evaluation domains. High-yield, protocol-aware principles are:
- RAO is commonly 15–20° for an average adult, adjusted for habitus; it projects the sternum off the spine and over the heart shadow
- PA-oblique breathing technique: quiet shallow breathing during the charted several-second exposure blurs overlying detail; it is not scatter control
- Centering: midpoint between the jugular notch and xiphoid, not the sternal angle
- Lateral: preferably erect, shoulders/arms posterior, horizontal perpendicular CR, commonly 60–72 in SID, and usually suspended inspiration
- PA versus AP: PA reduces sternal OID, but a straight PA/AP is a protocol variant rather than a universal routine substitute
- The sternal angle lies near the T4–T5 disc; nearby mediastinal landmarks vary
- Grid and exposure factors depend on thickness, equipment, and the validated chart
- Trauma safety: do not move an uncleared patient to obtain routine positioning
- Sternal fracture alone does not diagnose blunt cardiac injury; follow ECG/troponin and trauma protocols
- The normal xiphoid can be bifid, curved, or perforated — these are normal variants, not fractures
Clinical Pearls: Tips from Experienced Techs
- Practice the breathing instruction first. Match the wording and duration to the technique chart; rehearsal can identify patients who need an approved alternative before exposure.
- For the RAO, assess rather than guess. Start with the protocol's average obliquity, adjust for chest habitus, and center halfway from jugular notch to xiphoid—not at T4–T5 by rote.
- Do not copy a fixed exposure recipe. Detector response, grid, generator, patient thickness, and target exposure index differ. Use the installed chart and review exposure indicators.
- If the patient cannot follow breathing instructions, use the department's approved short-time alternative and document limitations. Avoid preventable repeats.
- For major trauma, escalate through the team. CT is highly useful for fracture and associated thoracic injury, but “near-100% sensitivity” is not universal across scan orientation/reconstruction and a technologist should not independently change the ordered test.
Summary
| Projection | Patient Position | CR | Centering Point | Breathing | Purpose |
|---|---|---|---|---|---|
| PA Oblique (RAO) | Prone/erect; usually 15–20°, habitus-adjusted | 0° | Midpoint notch-to-xiphoid; ~2.5 cm left MSP | Quiet breathing, charted several seconds | Move sternum off spine, over heart shadow |
| Lateral | Erect true lateral, shoulders/arms back | 0° horizontal | Midpoint notch-to-xiphoid | Usually suspend inspiration | Profile and displacement |
| Straight PA/AP | Ordered/local variant only | Protocol-specific | Midpoint notch-to-xiphoid | Protocol-specific | Limited by spinal superimposition |
📝 Key Takeaway
The common dedicated routine is RAO plus lateral. Center both at the midpoint between jugular notch and xiphoid. Use habitus-adjusted obliquity and quiet-breathing blur for the RAO when specified; use true lateral geometry, a longer SID, arms posterior, and usually suspended inspiration for the lateral. Protect trauma precautions, use the validated exposure chart, and never treat a radiograph as exclusion of intrathoracic injury. For more thoracic imaging practice, see our rib X-ray positioning guide, portable chest X-ray technique article, and image critique methodology.
Authoritative Sources and Protocol Boundaries
Accessed July 28, 2026. Numeric positioning values above are identified as teaching/protocol values rather than universal clinical mandates.
- University of Missouri Clinical Preceptor Reference Guide — Sternum: accredited-program procedure guide for routine RAO/lateral positioning, midpoint centering, SID, and respiration.
- ARRT Examination Content Specifications: official scope of tested radiography content; no guaranteed sternum question count.
- ACR Appropriateness Criteria — Major Blunt Trauma: chest radiography/CT selection depends on trauma scenario.
- EAST Practice Management Guideline — Blunt Cardiac Injury Screening: ECG/troponin recommendations and the limited significance of isolated sternal fracture.
- AAPM Position Statement PP 32-A: routine gonadal/fetal shielding should be discontinued.
- Khoriati et al., Sternal fractures and their management: peer-reviewed overview of diagnosis, associated injury, and management.